Using Slick 2D to write a game
One of the sessions I attended at JaveOne this year was about games and Java. In that session one of the speakers mentioned Slick, a Java 2D engine for games that provides more or less everything one needs to write a game. And indeed, after spending a few hours using it, I think it’s true that using Slick it’s very easy and fast to implement games in Java.
Slick comes with several source code examples of how to use it, but, unfortunatelly with only limited documentation; the Slick wiki as well as the API Javadocs (though I found the forums to be of a great help). This is the only drawback I see. I think that the people behind Slick need to write more documentation of how to use it since many people, especially new developers, might not be able to follow the source code examples.
Ok enough talking, lets see how we can write a very simple game using Slick. Our game will consist of a map, a sprite, animation of the sprite and collision detection when the sprite hits a wall. It’s a very simple game, the purpose was just to see what Slick is and how easy it is to write a game.
First download the Slick libraries from the Slick site. I downloaded the full distribution and unzipped it on my hard drive. The full distribution contains the slick.jar file, several other libraries, example source code as well as the native libraries necessary to run the games.
Lets start by creating a project in NetBeans. Go to File… New Project… Java Application and create a project. Once you create the NetBeans project you should also create two directories in the project folder. You can create them physically (outside NetBeans) or through NetBeans if you do a right click on the project and choose New… Other… Other… Folder. I call mine natives-mac and data. The first one will hold the native libraries needed for mac and the data the game’s data such as the game’s art. Unzip the contents of the file natives-mac.jar (from the /lib folder of where you unzipped the slick distribution) into the /natives-mac folder of your project. Also copy the rocks.png and the grass.png files (from the testdate folder) into your /data folder of your project. We will use these two files to create our map.
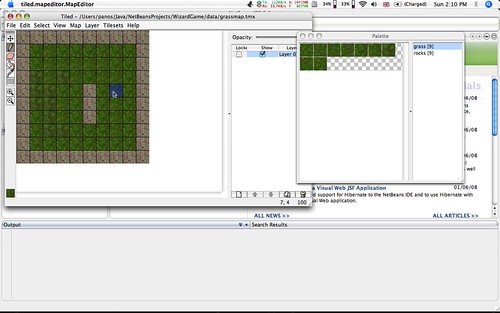
I used the Tiled tool to create the map. The Tiled tool allows us to use images as tiles and create any map we want. Run the tiled map by running the tiled.jar fie, create a new map (I created an orthogonal one with a 10×10 dimensions) and then create a new Tileset by choosing Tilesets -> New Tileset… Give it a the name grass since it will consist of grass tiles, tick the Reference tileset image tick box and choose the grass.png file in your /data folder. Create another tileset, call it rocks, choose the rocks.png file but also click on the Set Default Properties… button and add a property “blocked” and give it the value “true”. This property indicates that a rocks tile will block movement and it will be used later in our game to do collision detection.
Once the tilesets are created click on the lower left corner to bring up the Paletter window. From there you can choose the tileset you want and create a map. I created a very simple map and saved it as grassmap.tmx in my /data folder.
Before we start writing the code we need to have all the relevant jar in the classpath. We need slick.jar, ibxm.jar and lwjgl.jar. You can add them by right clicking on project Libraries… Add JAR/Folder. We also need to define the java.library.path to point to where we have the mac natives. This should be set as VM option
-Djava.library.path=natives-mac/
You can do it by right clicking on the project and choosing Properties -> Run and you will see the VM options text field.
We start our game by creating a new class that extends BasicGame. We also need to implement all the abstract methods of the BasicGame class as well as the render method of the Game interface. Then we need to pass an instance of our BasicGame class to an AppGameContainer class as discribed at the wiki. This is pretty straight forward and the code should look something like this
/*
* To change this template, choose Tools | Templates
* and open the template in the editor.
*/
package game.wizard;

import org.newdawn.slick.AppGameContainer;
import org.newdawn.slick.BasicGame;
import org.newdawn.slick.GameContainer;
import org.newdawn.slick.Graphics;
import org.newdawn.slick.SlickException;
/**
 * @author panos
 */
public class WizardGame extends BasicGame
{
    public WizardGame()
    {
        super("Wizard game");
    }

    public static void main(String[] arguments)
    {
        try
        {
            AppGameContainer app = new AppGameContainer(new WizardGame());
            app.setDisplayMode(500, 400, false);
            app.start();
        }
        catch (SlickException e)
        {
            e.printStackTrace();
        }
    }

    @Override
    public void init(GameContainer container) throws SlickException
    {
    }

    @Override
    public void update(GameContainer container, int delta) throws SlickException
    {
    }

    public void render(GameContainer container, Graphics g) throws SlickException
    {
    }
}
If you run this it should display an empty window; not very useful. Lets start then by first loading up the map we have created. The class TiledMap represents a tiled map.
private TiledMap grassMap;
...
grassMap = new TiledMap("data/grassmap.tmx");
The loading of the resources should be done in the init() method of our class. But we alos need to render our map once we created it. The rendering should be done in the render method
grassMap.render(0, 0);
If you run the new code you should see the map loaded up. What else do we need? A sprite. I found loads of free game sprites to use here. I choose a wizard-like sprite, edited it a bit using seashore because I wanted a transparent background and saved them in my data/ folder. The next thing we have to do is to define the animation of the sprite. We want to constantly draw the images one after the other in order to create the sense that our sprite is moving. For this we should defined in our init method four Image arrays, each one containing the images for our movement, up, down, left and right.
Image [] movementUp = {new Image("data/wmg1_bk1.png"), new Image("data/wmg1_bk2.png")};
Image [] movementDown = {new Image("data/wmg1_fr1.png"), new Image("data/wmg1_fr2.png")};
Image [] movementLeft = {new Image("data/wmg1_lf1.png"), new Image("data/wmg1_lf2.png")};
Image [] movementRight = {new Image("data/wmg1_rt1.png"), new Image("data/wmg1_rt2.png")};
int [] duration = {300, 300};
Note that we also defined a duration array. This indicates how ofter we want to draw our images when the sprite moves. The 300 and 300 (in milliseconds) values mean that we want to draw the first and second images every 300 milliseconds. These four Image arrays should be used for the animation of our sprite. For this we have to create an Animation object.
private Animation sprite, up, down, left, right;
...
/*
* false variable means do not auto update the animation.
* By setting it to false animation will update only when
* the user presses a key.
*/
up = new Animation(movementUp, duration, false);
down = new Animation(movementDown, duration, false);
left = new Animation(movementLeft, duration, false);
right = new Animation(movementRight, duration, false);

// Original orientation of the sprite. It will look right.
sprite = right;
We created four animation objects, each for each direction of our sprite. The only thing left to do now is to draw the sprite on the map. We can decide on an initial location of the sprite, lets say 34 points on the x axis and 34 points on the y axis. This should put the sprite on the 1,1 block (since the blocks are 34×34 points in dimension). Then we should draw the sprite, in the render method:
private float x = 34f, y = 34f;
...

sprite.draw((int)x, (int)y);
The movement of the sprite needs to be done within the update method. We should update the x and y coordinates so the render method can update the location of the sprite. We need to update the coordinates as soon as the up, down, left and right arrow key is pressed. To read the key pressed we can use the Input class and check if it’s up, down, left or right. If it is then we should update the delta value of the sprite as well as the x and y axis values. The lowest the delta value is the slowest the sprit will animate. So if you want to to move fast you should have a high delta value. I chose a value of 0.1 which i multiply with the delta value and add (or subtract) it from the x or y position of the sprite. My update method is
        Input input = container.getInput();
        if (input.isKeyDown(Input.KEY_UP))
        {
            sprite = up;
            sprite.update(delta);
            // The lower the delta the slowest the sprite will animate.
            y -= delta * 0.1f;
        }
        else if (input.isKeyDown(Input.KEY_DOWN))
        {
            sprite = down;
            sprite.update(delta);
            y += delta * 0.1f;
        }
        else if (input.isKeyDown(Input.KEY_LEFT))
        {
            sprite = left;
            sprite.update(delta);
            x -= delta * 0.1f;
        }
        else if (input.isKeyDown(Input.KEY_RIGHT))
        {
            sprite = right;
            sprite.update(delta);
            x += delta * 0.1f;
        }
If you run the above code you will see that you can move around the map. But you will also notice that you can move the sprite above the walls as well. We don’t want this. We only need to move the sprite where there is grass, otherwise we want it to stop. We should do collision detection on the rock tiles. To do these we can define a boolean two dimensional array which represents all blocks in our map. If the block contains a rock tile we set the value to true, otherwise to false. We can do this by reading the “blocked” property of our tile map we defined in the beginning.
private boolean[][] blocked;
private static final int SIZE = 34; …
// build a collision map based on tile properties in the TileD map
blocked = new boolean[grassMap.getWidth()][grassMap.getHeight()];
for (int xAxis=0;xAxis

/*
* To change this template, choose Tools | Templates
* and open the template in the editor.
*/
package game.wizard;
import org.newdawn.slick.Animation;
import org.newdawn.slick.AppGameContainer;
import org.newdawn.slick.BasicGame;
import org.newdawn.slick.GameContainer;
import org.newdawn.slick.Graphics;
import org.newdawn.slick.Image;
import org.newdawn.slick.Input;
import org.newdawn.slick.SlickException;
import org.newdawn.slick.tiled.TiledMap;
/**
*
* @author panos
*/
public class WizardGame extends BasicGame
{
private TiledMap grassMap;
private Animation sprite, up, down, left, right;
private float x = 34f, y = 34f;
/** The collision map indicating which tiles block movement – generated based on tile properties */
private boolean[][] blocked;
private static final int SIZE = 34;
public WizardGame()
{
super(“Wizard game”);
}
public static void main(String [] arguments)
{
try
{
AppGameContainer app = new AppGameContainer(new WizardGame());
app.setDisplayMode(500, 400, false);
app.start();
}
catch (SlickException e)
{
e.printStackTrace();
}
}
@Override
public void init(GameContainer container) throws SlickException
{
Image [] movementUp = {new Image(“data/wmg1_bk1.png”), new Image(“data/wmg1_bk2.png”)};
Image [] movementDown = {new Image(“data/wmg1_fr1.png”), new Image(“data/wmg1_fr2.png”)};
Image [] movementLeft = {new Image(“data/wmg1_lf1.png”), new Image(“data/wmg1_lf2.png”)};
Image [] movementRight = {new Image(“data/wmg1_rt1.png”), new Image(“data/wmg1_rt2.png”)};
int [] duration = {300, 300}; grassMap = new TiledMap(“data/grassmap.tmx”);
/*
* false variable means do not auto update the animation.
* By setting it to false animation will update only when
* the user presses a key.
*/
up = new Animation(movementUp, duration, false);
down = new Animation(movementDown, duration, false);
left = new Animation(movementLeft, duration, false);
right = new Animation(movementRight, duration, false);
// Original orientation of the sprite. It will look right.
sprite = right;
// build a collision map based on tile properties in the TileD map
blocked = new boolean[grassMap.getWidth()][grassMap.getHeight()];
for (int xAxis=0;xAxis
Leave a reply to Siddiqui Cancel reply
About me

My name is Panos Konstantinidis and I live in London - U.K. I am a software engineer, a Java Champion and co-founder and co-admin of the hellenic jug in Athens - Greece.
In my spare time I also participate in experts exchange. You can get in touch with me at this e-mail address.


Hi,
My name is James Branam and I’m the NetBeans Community Docs Manager. Your blog entry would make a fantastic tutorial for our Community Docs wiki (http://wiki.netbeans.org//CommunityDocs). Would you be willing to contribute it? If you need any help or have any questions, please contact me at james.branam@sun.com. I look forward to hearing from you.
Hello James, I would be glad to contribute my post to the NetBeans community. Saying that I might change it a bit to include more information about how you can set up the project and all the relevant classes.
Hi,
Great news. I’m looking forward to seeing the contribution.
Thanks!
–James
Nice Tutorial!
Do you have the texture map and png images available?
I’d like to compile and run it from start to finish to make sure I have it setup correctly. It might help others too.
Thanks!
Hello J, yes I have them, let me see how I can post them.
Here is the XML file (the map), called grassmap.tmx
<?xml version="1.0"?> <map version="0.99b" orientation="orthogonal" width="10" height="10" tilewidth="34" tileheight="34"> <tileset name="grass" firstgid="1" tilewidth="34" tileheight="34"> <image source="grass.png"/> </tileset> <tileset name="rocks" firstgid="10" tilewidth="34" tileheight="34"> <image source="rocks.png"/> <tile id="0"> <properties> <property name="blocked" value="true"/> </properties> </tile> <tile id="1"> <properties> <property name="blocked" value="true"/> </properties> </tile> <tile id="2"> <properties> <property name="blocked" value="true"/> </properties> </tile> <tile id="3"> <properties> <property name="blocked" value="true"/> </properties> </tile> <tile id="4"> <properties> <property name="blocked" value="true"/> </properties> </tile> <tile id="5"> <properties> <property name="blocked" value="true"/> </properties> </tile> <tile id="6"> <properties> <property name="blocked" value="true"/> </properties> </tile> <tile id="7"> <properties> <property name="blocked" value="true"/> </properties> </tile> <tile id="8"> <properties> <property name="blocked" value="true"/> </properties> </tile> </tileset> <layer name="Layer 0" width="10" height="10"> <data encoding="base64" compression="gzip"> H4sIAAAAAAAAAONiYGDgIhKzAjEblMaG0dWhY3R17FBxdiR5ZLXI6tjR9LPiUcdGQB0rieqQ7calDh8mNnxBGAAqNB+OkAEAAA== </data> </layer> </map>All images can be found here:
I have them all in a folder called “data” under the NetBeans project folder. Hope the source code I posted works fine since I did change it on the fly to beautify it. If it doesn’t let me know.
Great! Thanks much! I’ll try this first thing tonight when I get home! Lovely.
Very NICE!
I got this working. It compiled and ran cleanly once I got the right classpath and data [images] named correctly.
Nice one, glad to know that the source code is working 🙂
Same with J! 😀
Very NICE!
We tried out your tutorial and got it working! A great help to our project! [to be integrated with networking :)]. Thanks a lot!
😦 I can’t get it to work with jcreator.
OK, same issue with netbeans (running on win). First of all, I followed your tutorial exactly and for netbeans. The dumb thing won’t recognize anything like “basicgame” unless I extract slick.jar and import org.newdawn.slick.*; and when I do the above, I get this error:
12 (line with pub class in it): is not abstract and does not override abstract method render(org.newdawn.slick.GameContainer,org.newdawn.slick.Graphics) in org.newdawn.slick.Game
Hello Matt, not sure what’s going wrong, but if in doubt it’s a classpath issue. You need to have all jar files (slick.jar, ibxm.jar and lwjgl.jar) in your classpath, or if you have extracted the classes of the slick.jar you also need to extract the classes of the rest two and put them in your classpath.
I just retried the code here (I am using Netbeans 6.1) and it’s working fine. I will try to run the code on Windows and see if I get the same errors as you.
Well if it wasn’t in the tutorial I didn’t do it ;). Also tried extracting the other two – same problem.
Nice tutorial, why isn’t this in the slick wiki? The eclipse one is there! Hmm.
Thank you neshaug. Maybe the slick people didn’t see it yet. In any way this tutorial is free and anyone can post it on their sites. Actually I am also thinking about putting it on the NetBeans side but I always postpone it. Hopefully I will do it soon.
@Matt
sorry for the late reply, I just had the chance to try the application on Windows. And you are right, you will get this error you are getting if you copy/paste my code. I accidentally imported the wrong Graphics class, java.awt.Graphics instead of the correct one org.newdawn.slick.Graphics. So please replace the following line
import java.awt.Graphics;
with the
import org.newdawn.slick.Graphics;
and it should work. Thanks for pointing that out.
I made the change, if you find any more issues please let me know.
Blogwalking ..
nice posting i found here,.. thanks for the info
Hi Thanks for the tutorial.
But I have a problem. When loading the map, it only displays a blank screen. It looks like it can find out the map xml file. The only difference is the map name is renamed to map.tmx and the grass and rocks image are saved as jpg, instead of png. Will this cause the problem?
Thanks in advice.
Hello arsene. Renaming the map should not have any effect as long as you change the line 57 of the programme to reflect this change. Renaming the .png files to .jpg will have an effect since the map loads them by their name. If you look at the map data you will notice this line for instance: wich loads the tile named grass.png. If you rename it to grass.jpg you will need to recreate the map from the beginning in order for the application to work.
Hope it helps.
Very nice tutorial. Clear. Short. Useful.
Thank you.
Pablo Lillia
(La Plata, Argentina)
hey i got this exception when running it.
Which one is line 128 of the WizardGame.java in your code?
the render line for the grassmap
I think taht there is an error with your tilemap. cause I loadedit into tiled and just resaved it. and now it works. but the collision detection is horrible no offence. I fixed itby setting the collision detection in a for loop so that it checked the entire side. instead of just the left corner.
here is what moving looks for for the left direction.
else if (input.isKeyDown(Input.KEY_LEFT))
{
sprite = left;
if (!isBlocked(x – delta * 0.1f, y))
{
collision = false;
}
for(z = 0;z<SIZE;z++)
{
if (isBlocked(x – delta * 0.1f, y + z))
{
collision = true;
z = SIZE;
}
}
if (!collision)
{
sprite.update(delta);
x -= delta * 0.1f;
}
}
hope I could help. 🙂
Yes you are right, the collision wasn’t exactly working as expected. I always wanted to sit down and fix it but I never did it. Thanks for fixing it.
NP glad I could help
Oh yeah I hate to take shots at the graphics only, but your pic is too big and that makes problems. you oculd keept he picture the same size and cahng ethe SIZE variable to a bigger number.
You did a really nice job with this Slick startup article.
Thanks a lot!
hello Panos;
thx for this great tutorial i just have two questions;
1) u have created the map using the “Tiled” tool, how can i create the map in a way to be dynamic? i mean if i need to put a specific image in a specific location (block) according to the information that i have in the database?
2) if the user clicked on a specific block on the map how can i get its location?
thx alot again 🙂
Hello Mona,
1) Not sure how you could do it. If you notice you will see that the map is basically XML data, maybe you could tamper with it and try to create the XML file dynamically with values from the database. Not sure if this will work but it’s worth a try. Or they might be other ways to create different kinds of maps. If you look at the documentation you might get more ideas.
2) You could do that by getting the x and y coordinates and then divide by the size of each block. There are a few methods in the BasicGame that handle mouse clicks and presses. You could do something like the following (assuming that you have set the size of each block to be 40×40)
@Override
public void mousePressed(int button, int x, int y)
{
System.out.println(“pressed: ” + (x/40) + ” ” + (y/40));
}
This would give you the x and y blocks. For instance a 0, 0 block would mean that you clicked on the left-topmost block of the map, and so on. Of course you would have to check if the block falls within the map you display on the screen because you might have a map which is smaller in size than the size of the screen.
Hope it helps.
hello again Panos 🙂
thx for help it helps me alot 🙂
however, i am still having problem changing the tiled image in a specific block in the xml file generated by “tiled tool”;
am trying to use TiledMap object to deal with that
some thing like this: grassMap.getTileSet(0).setTileSetImage(new Image(“data/grass.png”));
however that line of code change the images in the whole “layer which is layer 0”
i tried to handle the xml file manually but it is a bit complicated
so pls if u know how can i make that just give me the direction and i will do the rest myself;
this approach didnt work for me too: grassMap.getTileImage(x, y, 0); then i tried to set the image but it didnt work ? 😦
Hello Mona, sorry but I am not sure how you can do it. I have never tried this so I am not sure.
Thanks Panos for this short sweet sample!
I agree with h3ckf1r3 – the collision detection code needs some work. However there is no need to check every pixel along the side; you just need to check the first and the last one.
Here’s a fix that I believe is complete, efficient and accurate:
@Override
public void update(GameContainer container, int delta) throws SlickException
{
Input input = container.getInput();
float fdelta=delta*0.1f;
if (input.isKeyDown(Input.KEY_UP))
{
sprite = up;
if (!(isBlocked(x, y – fdelta) || isBlocked(x+SIZE-1, y – fdelta)))
{
sprite.update(delta);
// The lower the delta the slowest the sprite will animate.
y -= fdelta;
}
}
else if (input.isKeyDown(Input.KEY_DOWN))
{
sprite = down;
if (!(isBlocked(x, y + SIZE + fdelta) || isBlocked(x+SIZE-1, y + SIZE + fdelta)))
{
sprite.update(delta);
y += fdelta;
}
}
else if (input.isKeyDown(Input.KEY_LEFT))
{
sprite = left;
if (!(isBlocked(x – fdelta, y) || isBlocked(x – fdelta, y+SIZE-1)))
{
sprite.update(delta);
x -= fdelta;
}
}
else if (input.isKeyDown(Input.KEY_RIGHT))
{
sprite = right;
if (!(isBlocked(x + SIZE + fdelta, y) || isBlocked(x + SIZE + fdelta, y+SIZE-1)))
{
sprite.update(delta);
x += fdelta;
}
}
}
BTW, if you tweak the map so that it uses tiles the same size as the character (32×32), the vertical collisions look perfect. Two tiny changes will fix this. First open grassmap.tmx in a text editor and globally replace “34” with “32”. Finally you just need to edit the SIZE constant to be 32.
Hello laterality, yes you are right (as well as h3ckf1r3), this should fix the collision detection issue. Thanks for the update.
This is a great simple tutorial.
I start using GTGE but change to Slick because the code is open source 🙂
This is a great starting point.
Thanks a lot
Hello,
All those sprites aren’t transperant, how can I make them transperant?
Thanks,
William
Hello William, this depends on the documentation of the image editor you are using. I used seashore and it was pretty easy.
So I have to make all images transparent myself and save them as a .png?
Yes I’m afraid so.
Hey Panos,
I tried to set up slick with netbeans following the above instructions but when I tried to run the code I got this:
Exception in thread “main” java.lang.UnsatisfiedLinkError: no lwjgl in java.library.path
I don’t know what I did wrong as I did just what is written in the tutorial. Can you help me plz?
Sorry mate, my bad, I put the 2 folders (data and natives) in the src folder accidentally…. :)))
Great introduction to slick and tiled! I haven’t used either library very extensively, however I did try them out for a small project I was working on. One thing I found was that there is no way to load tile map data without also loading the tile image data (for example, when writing a client/server game where the server would only need to load the tilemap data). I was wondering if you might know a way around this, or perhaps, if a new version of the slick/tiled libraries support this?
Hello Josiah thanks for your kind words. I am not sure how you could do it. This post was my first attempt to write a (very) basic game, I just experimented in a way. Maybe someone else knows how to do it.
Very NICE!
Tried out your tutorial and got it working! A great help to our project!
Thanks a lot!
Hi Panos! I know this is not the right place but, since Slick2d forum seems closed, dont know who else I could turn to.
If I want to load my resources from a different class, lets say, ResLoader class, do I need to create an Init method for ResLoader? Do I need to call that method from any place?
thx!
Hello Pablo, you could load the resources from whatever class you like. You do not need to have an init method in there. Just write your class and then call it from within the init() method of your game (in my example the WizardGame class). If your ResLoader is your game class then yes, you will need to define an init() method in there.
Would it be possible to setup a tiled map in like a side scroller view? Or would that require a different approach? I was thinking set the “floor” tiles as blocked, and implement some kind of 2d physics engine to say if there isn’t a blocked tile under you, fall until you hit one.
Hello Lance, yes it is possible. Slick comes with a few examples that show how you can do it. Have a look at the slick download code, in the examples folder.
Thanks a ton for this guide. I was able to get a basic Slick window up and running in a few minutes, something I wasn’t able to do in other game engines!
Great guide. I am getting stuck at towards the beginning though and I am unable to figure this out. I am at this point:
“If you run this it should display an empty window; not very useful. Lets start then by first loading up the map we have created. The class TiledMap represents a tiled map.”
When I run the code, I get this: (and no window)
Exception in thread “main” java.lang.UnsatisfiedLinkError: no lwjgl in java.library.path
I set the Project VM run option to : -Djava.library.path=natives/
the ‘natives’ folder is in my Project folder.
I right clicked on the “Libraries” project folder and added the 3 jars – ibxm, lwjgl, and slick.
Pretty much, I followed the tutorial exactly!
Any help would be much appreciated. I’m on Windows 7 64-bit, using Netbeans 6.9.1
Hello Jason, what happens if you put the full path to your native libraries there?
-Djava.library.path=c:/…./natives/
Same error happens when I use:
-Djava.library.path=C:/WorkspaceNB/Tutorial/natives/
as the path – no lwjgl in java.library.path
Lets try something else. Can you copy the dlls in the C:\WINDOWS\system32 folder and try again? By doing this you do not need the -Djava.library.path option.
D’oh. I discovered the problem. I extracted native-mac instead of native-win32. That solved the issue. I did run into:
C:\WorkspaceNB\Tutorial\natives\lwjgl.dll: Can’t load IA 32-bit .dll on a AMD 64-bit platform
If anyone else runs into this: the solution is to download the latest LWJGL, then replace lwjgl.jar and the native slick libraries with the proper 64 bit .dlls.
Thanks for your time!
Hmm, this tutorial was great for the most part however, I think in the future I will avoid using slick and tile-maps for collision detection… it’s just too buggy.
hello Panos, thanks for the guide it’s very helpfull, but I have a problem with the collision. I tried the h3ckf1r3 and laterality fix’s but I it’s go worst, I don’t know how fix it, my update() method is copy/paste of the laterality comment so I don’t put it another time.
Thanks in advance 🙂
German Tutorial for Slick: http://blog.mynotiz.de/programmieren/java-spieleentwicklung-einstieg-in-slick-tutorial-1133/
Hi Panos! I just dove into Java game development today, and I just downloaded this and got it working. Thanks so much! I think this is still pretty much the best tutorial out there for games with Slick 2D.
One suggestion: it was a bit laborious to sift through the comments to get the data files: the XML file and then downloading each individual image file on flickr. Could I post a complete version of this on Github so people can just download a working version all at once?
Hello Dan, thank you for your nice words. I am not sure where I have the project (it’s been a few years since I wrote this tutorial), I will look for it and if I find it I will upload a complete version to github.
Perfect. Thanks!
Hello Panos,
thanks a lot. I was looking for the best java game engine. I found Slick 2D. But I still have a problem running the WizardGame project. I used the Netbeans and I add all the necessary librairies, but when I try to run it I obtain:
Exception in thread “main” java.lang.UnsatisfiedLinkError: no lwjgl in java.library.path
at java.lang.ClassLoader.loadLibrary(ClassLoader.java:1860)
at java.lang.Runtime.loadLibrary0(Runtime.java:845)
at java.lang.System.loadLibrary(System.java:1084)
at org.lwjgl.Sys$1.run(Sys.java:75)
at java.security.AccessController.doPrivileged(Native Method)
at org.lwjgl.Sys.doLoadLibrary(Sys.java:68)
at org.lwjgl.Sys.loadLibrary(Sys.java:84)
at org.lwjgl.Sys.(Sys.java:101)
at org.lwjgl.opengl.Display.(Display.java:128)
at org.newdawn.slick.AppGameContainer$1.run(AppGameContainer.java:39)
at java.security.AccessController.doPrivileged(Native Method)
at org.newdawn.slick.AppGameContainer.(AppGameContainer.java:36)
at game.wizard.WizardGame.main(WizardGame.java:28)
Java Result: 1
BUILD SUCCESSFUL (total time: 0 seconds)
I tried to find what happens, but…
Please, could you help me, I was at the level where an empty window should be displayed, but nothing happen and I cannot progress.
Thanks,
junior
As described in the beginningish of the article you need to set the VM argument “java.library.path”.
If it’s set like this:
-Djava.library.path=natives-windows/
The map needs to contain the lwjgl DLLs for your OS and arch.
I have the same problem as Junior. I did what you said but it did’nt works… Help, please 🙂
Can I use the lwjgl.jar in my project’s Liibrary?
Is there any way to resize/scale the tiles dynamically in your program without changing the .tmx file?
Just reading this now. Very nice introduction. thanks.
You can. Just import it like any other jar file.
I’ve a problem: java.lang.NullPointerException
on line 112: sprite.draw((int)x, (int)y);
The sprite is probably null. Can you make sure you have initialised it?
Yeah, I fixed it. Hey, with this tutorial, I’m programming a PacMan, I just wanna know if I can program a class, called by “Pac” (’cause it’s the pacman sprite), render() the map in 0,0 position, and draw the pacman like this
private Pac pac = new Pac(); ... public void render(GameContainer gc, Graphics g) throws SlickException{ Graphics2D g2d = (Graphics2D)g; map.render(0,0); g2d.drawImage(pac.getImage(), pac.getX(), pac.getY(), this ); } //These getters are pac's getterswell, i’m just wondering. i think it’s best to divide the animation, then call the animation inside game class. can i call these class, which extends BasicGame, and multiply it?? O.o
so if i have 1 animation of monsters, can i multiply it?
if i can’t, then what i must do to multiply these animation of monsters? O.o
thanks very much for the tutorial, it would make the work much more easy to the beginners inthe game programming. now a i’m looking more information about game design and design patterns to make a game much scalable.
Just wondering if there’s a specific reason you fill an array with all the blocked values, rather than simply writing a method like this
private boolean getTileAttribute(String attribute, int tileX, int tileY){
int tileID = map.getTileId(tileX, tileY, 0);
String value = map.getTileProperty(tileID, attribute, “false”);
if (“true”.equals(value)) return true;
else return false;
}
Gavin no specific reason. At the time I wrote this tutorial I thought an array was ok.
run:
Thu May 09 02:59:59 AST 2013 INFO:Slick Build #261
Thu May 09 02:59:59 AST 2013 INFO:LWJGL Version: 2.8.5
Thu May 09 02:59:59 AST 2013 INFO:OriginalDisplayMode: 1440 x 900 x 32 @60Hz
Thu May 09 02:59:59 AST 2013 INFO:TargetDisplayMode: 980 x 580 x 0 @0Hz
Thu May 09 03:00:00 AST 2013 INFO:Starting display 980×580
Thu May 09 03:00:00 AST 2013 INFO:Use Java PNG Loader = true
Thu May 09 03:00:00 AST 2013 INFO:Controllers not available
Exception in thread “main” java.lang.StringIndexOutOfBoundsException: String index out of range: -1
at java.lang.String.substring(String.java:1911)
at org.newdawn.slick.tiled.TiledMap.(TiledMap.java:112)
at org.newdawn.slick.tiled.TiledMap.(TiledMap.java:96)
at JavaGame.Play.init(Play.java:41)
at JavaGame.Game.initStatesList(Game.java:32)
at org.newdawn.slick.state.StateBasedGame.init(StateBasedGame.java:170)
at org.newdawn.slick.AppGameContainer.setup(AppGameContainer.java:433)
at org.newdawn.slick.AppGameContainer.start(AppGameContainer.java:357)
at JavaGame.Game.main(Game.java:45)
Java Result: 1
When i execute my game, it gives me this error.
How to resolve it ?
Hi, i followed your tutorial… but i get an error that I don’t know how to resolve:
I wrote the ” if (isBlocked() … ” method where, in the code, I press the S button on the keyboard (S is for “down”, i don’t like the arrows).
When I run the project, I’m able to move the player to the right, to the left and up, but not down! It’s like the ” for ” method in the Tiles class adds to the ” path ” array every block… not just the ones with the “blocked” property.
I show you my classes, hoping you can help me… (I can’t find any other tutorial online and I really liked this one…).
http://pastebin.com/3Hw7Q1aw = Tiles class
http://pastebin.com/AzjjzJDC = Player class
So I think I managed to fix the logic of the collision that you mentioned. Using your original code, I ran into the problem of my sprite going too far right or too far down. Because you’re passing the isBlocked() method floats, when you go to cast them to ints for use in the array, they pass the method a float that is just under the highest index when divided by your size when you reach those walls, and since java truncates such casts to the lowest equal int, you end up asking for that index rather than the last index, which makes the test return false. In my project, I added a boolean value as a parameter which basically asks if you are adding to the current position value. If you are, round to HIGHEST equal int using Math.ceil(double a), and round to the lowest one using Math.floor(double a)(I probably didn’t have to do that, but it looks nicer) if you pass it false. this makes any floats that are just under the highest index return the proper boolean value in the isBlocked() method. My isBlocked() method looks like this:
public boolean isBlocked(float x, float y, boolean adding) {
int xBlock;
int yBlock;
if(adding)
{
xBlock = (int) Math.ceil(x / BASE);
yBlock = (int) Math.ceil(y / BASE);
}
else
{
xBlock = (int) Math.floor(x / BASE);
yBlock = (int) Math.floor(y / BASE);
}
return blocked[xBlock][yBlock];
}
If you implement it this way, don’t forget to import java.lang.Math in whatever class is using the method.
We’ll what if you have a biget map? How do you move the camera so that he doesn’t fall off?
Hi ~
I created a Test based on your code, and it worked perfectly ~ Thanks a lot ^_^
Although I got an annoying error – I used a 32×48 sprite instead of 32×32 (my SIZE is 32), so when I ran the code, somehow the sprite can go through walls in some directions. I tried to change the code, but this still occured.
How can I change the value to fix it ? Any ideas?
Thanks a lot, again :”>
Hey great article! But I need help I used that tiled program but I found it really hard to get the right sized tile map to fit the window. I ended up measuring it with a ruler and figured it out with some algebra. Is their an easier way to know exactly how big the map needs to be? Also why do you divide the x and y in isBlocked by the SIZE?
Is there any way to put each tile in an array and then access them by there data values?
In addition, I didn’t notice some bars that are normally up on games like bejeweled on the side. Is there any way to create a game that allows a menu to show up on the side like that? Thx.