Archive
Using Slick 2D to write a game
One of the sessions I attended at JaveOne this year was about games and Java. In that session one of the speakers mentioned Slick, a Java 2D engine for games that provides more or less everything one needs to write a game. And indeed, after spending a few hours using it, I think it’s true that using Slick it’s very easy and fast to implement games in Java.
Slick comes with several source code examples of how to use it, but, unfortunatelly with only limited documentation; the Slick wiki as well as the API Javadocs (though I found the forums to be of a great help). This is the only drawback I see. I think that the people behind Slick need to write more documentation of how to use it since many people, especially new developers, might not be able to follow the source code examples.
Ok enough talking, lets see how we can write a very simple game using Slick. Our game will consist of a map, a sprite, animation of the sprite and collision detection when the sprite hits a wall. It’s a very simple game, the purpose was just to see what Slick is and how easy it is to write a game.
First download the Slick libraries from the Slick site. I downloaded the full distribution and unzipped it on my hard drive. The full distribution contains the slick.jar file, several other libraries, example source code as well as the native libraries necessary to run the games.
Lets start by creating a project in NetBeans. Go to File… New Project… Java Application and create a project. Once you create the NetBeans project you should also create two directories in the project folder. You can create them physically (outside NetBeans) or through NetBeans if you do a right click on the project and choose New… Other… Other… Folder. I call mine natives-mac and data. The first one will hold the native libraries needed for mac and the data the game’s data such as the game’s art. Unzip the contents of the file natives-mac.jar (from the /lib folder of where you unzipped the slick distribution) into the /natives-mac folder of your project. Also copy the rocks.png and the grass.png files (from the testdate folder) into your /data folder of your project. We will use these two files to create our map.
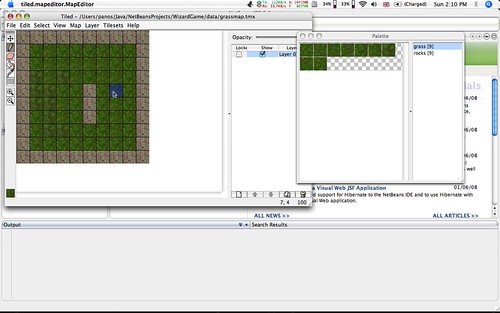
I used the Tiled tool to create the map. The Tiled tool allows us to use images as tiles and create any map we want. Run the tiled map by running the tiled.jar fie, create a new map (I created an orthogonal one with a 10×10 dimensions) and then create a new Tileset by choosing Tilesets -> New Tileset… Give it a the name grass since it will consist of grass tiles, tick the Reference tileset image tick box and choose the grass.png file in your /data folder. Create another tileset, call it rocks, choose the rocks.png file but also click on the Set Default Properties… button and add a property “blocked” and give it the value “true”. This property indicates that a rocks tile will block movement and it will be used later in our game to do collision detection.
Once the tilesets are created click on the lower left corner to bring up the Paletter window. From there you can choose the tileset you want and create a map. I created a very simple map and saved it as grassmap.tmx in my /data folder.
Before we start writing the code we need to have all the relevant jar in the classpath. We need slick.jar, ibxm.jar and lwjgl.jar. You can add them by right clicking on project Libraries… Add JAR/Folder. We also need to define the java.library.path to point to where we have the mac natives. This should be set as VM option
-Djava.library.path=natives-mac/
You can do it by right clicking on the project and choosing Properties -> Run and you will see the VM options text field.
We start our game by creating a new class that extends BasicGame. We also need to implement all the abstract methods of the BasicGame class as well as the render method of the Game interface. Then we need to pass an instance of our BasicGame class to an AppGameContainer class as discribed at the wiki. This is pretty straight forward and the code should look something like this
/*
* To change this template, choose Tools | Templates
* and open the template in the editor.
*/
package game.wizard;

import org.newdawn.slick.AppGameContainer;
import org.newdawn.slick.BasicGame;
import org.newdawn.slick.GameContainer;
import org.newdawn.slick.Graphics;
import org.newdawn.slick.SlickException;
/**
 * @author panos
 */
public class WizardGame extends BasicGame
{
    public WizardGame()
    {
        super("Wizard game");
    }

    public static void main(String[] arguments)
    {
        try
        {
            AppGameContainer app = new AppGameContainer(new WizardGame());
            app.setDisplayMode(500, 400, false);
            app.start();
        }
        catch (SlickException e)
        {
            e.printStackTrace();
        }
    }

    @Override
    public void init(GameContainer container) throws SlickException
    {
    }

    @Override
    public void update(GameContainer container, int delta) throws SlickException
    {
    }

    public void render(GameContainer container, Graphics g) throws SlickException
    {
    }
}
If you run this it should display an empty window; not very useful. Lets start then by first loading up the map we have created. The class TiledMap represents a tiled map.
private TiledMap grassMap;
...
grassMap = new TiledMap("data/grassmap.tmx");
The loading of the resources should be done in the init() method of our class. But we alos need to render our map once we created it. The rendering should be done in the render method
grassMap.render(0, 0);
If you run the new code you should see the map loaded up. What else do we need? A sprite. I found loads of free game sprites to use here. I choose a wizard-like sprite, edited it a bit using seashore because I wanted a transparent background and saved them in my data/ folder. The next thing we have to do is to define the animation of the sprite. We want to constantly draw the images one after the other in order to create the sense that our sprite is moving. For this we should defined in our init method four Image arrays, each one containing the images for our movement, up, down, left and right.
Image [] movementUp = {new Image("data/wmg1_bk1.png"), new Image("data/wmg1_bk2.png")};
Image [] movementDown = {new Image("data/wmg1_fr1.png"), new Image("data/wmg1_fr2.png")};
Image [] movementLeft = {new Image("data/wmg1_lf1.png"), new Image("data/wmg1_lf2.png")};
Image [] movementRight = {new Image("data/wmg1_rt1.png"), new Image("data/wmg1_rt2.png")};
int [] duration = {300, 300};
Note that we also defined a duration array. This indicates how ofter we want to draw our images when the sprite moves. The 300 and 300 (in milliseconds) values mean that we want to draw the first and second images every 300 milliseconds. These four Image arrays should be used for the animation of our sprite. For this we have to create an Animation object.
private Animation sprite, up, down, left, right;
...
/*
* false variable means do not auto update the animation.
* By setting it to false animation will update only when
* the user presses a key.
*/
up = new Animation(movementUp, duration, false);
down = new Animation(movementDown, duration, false);
left = new Animation(movementLeft, duration, false);
right = new Animation(movementRight, duration, false);

// Original orientation of the sprite. It will look right.
sprite = right;
We created four animation objects, each for each direction of our sprite. The only thing left to do now is to draw the sprite on the map. We can decide on an initial location of the sprite, lets say 34 points on the x axis and 34 points on the y axis. This should put the sprite on the 1,1 block (since the blocks are 34×34 points in dimension). Then we should draw the sprite, in the render method:
private float x = 34f, y = 34f;
...

sprite.draw((int)x, (int)y);
The movement of the sprite needs to be done within the update method. We should update the x and y coordinates so the render method can update the location of the sprite. We need to update the coordinates as soon as the up, down, left and right arrow key is pressed. To read the key pressed we can use the Input class and check if it’s up, down, left or right. If it is then we should update the delta value of the sprite as well as the x and y axis values. The lowest the delta value is the slowest the sprit will animate. So if you want to to move fast you should have a high delta value. I chose a value of 0.1 which i multiply with the delta value and add (or subtract) it from the x or y position of the sprite. My update method is
        Input input = container.getInput();
        if (input.isKeyDown(Input.KEY_UP))
        {
            sprite = up;
            sprite.update(delta);
            // The lower the delta the slowest the sprite will animate.
            y -= delta * 0.1f;
        }
        else if (input.isKeyDown(Input.KEY_DOWN))
        {
            sprite = down;
            sprite.update(delta);
            y += delta * 0.1f;
        }
        else if (input.isKeyDown(Input.KEY_LEFT))
        {
            sprite = left;
            sprite.update(delta);
            x -= delta * 0.1f;
        }
        else if (input.isKeyDown(Input.KEY_RIGHT))
        {
            sprite = right;
            sprite.update(delta);
            x += delta * 0.1f;
        }
If you run the above code you will see that you can move around the map. But you will also notice that you can move the sprite above the walls as well. We don’t want this. We only need to move the sprite where there is grass, otherwise we want it to stop. We should do collision detection on the rock tiles. To do these we can define a boolean two dimensional array which represents all blocks in our map. If the block contains a rock tile we set the value to true, otherwise to false. We can do this by reading the “blocked” property of our tile map we defined in the beginning.
private boolean[][] blocked;
private static final int SIZE = 34; …
// build a collision map based on tile properties in the TileD map
blocked = new boolean[grassMap.getWidth()][grassMap.getHeight()];
for (int xAxis=0;xAxis

/*
* To change this template, choose Tools | Templates
* and open the template in the editor.
*/
package game.wizard;
import org.newdawn.slick.Animation;
import org.newdawn.slick.AppGameContainer;
import org.newdawn.slick.BasicGame;
import org.newdawn.slick.GameContainer;
import org.newdawn.slick.Graphics;
import org.newdawn.slick.Image;
import org.newdawn.slick.Input;
import org.newdawn.slick.SlickException;
import org.newdawn.slick.tiled.TiledMap;
/**
*
* @author panos
*/
public class WizardGame extends BasicGame
{
private TiledMap grassMap;
private Animation sprite, up, down, left, right;
private float x = 34f, y = 34f;
/** The collision map indicating which tiles block movement – generated based on tile properties */
private boolean[][] blocked;
private static final int SIZE = 34;
public WizardGame()
{
super(“Wizard game”);
}
public static void main(String [] arguments)
{
try
{
AppGameContainer app = new AppGameContainer(new WizardGame());
app.setDisplayMode(500, 400, false);
app.start();
}
catch (SlickException e)
{
e.printStackTrace();
}
}
@Override
public void init(GameContainer container) throws SlickException
{
Image [] movementUp = {new Image(“data/wmg1_bk1.png”), new Image(“data/wmg1_bk2.png”)};
Image [] movementDown = {new Image(“data/wmg1_fr1.png”), new Image(“data/wmg1_fr2.png”)};
Image [] movementLeft = {new Image(“data/wmg1_lf1.png”), new Image(“data/wmg1_lf2.png”)};
Image [] movementRight = {new Image(“data/wmg1_rt1.png”), new Image(“data/wmg1_rt2.png”)};
int [] duration = {300, 300}; grassMap = new TiledMap(“data/grassmap.tmx”);
/*
* false variable means do not auto update the animation.
* By setting it to false animation will update only when
* the user presses a key.
*/
up = new Animation(movementUp, duration, false);
down = new Animation(movementDown, duration, false);
left = new Animation(movementLeft, duration, false);
right = new Animation(movementRight, duration, false);
// Original orientation of the sprite. It will look right.
sprite = right;
// build a collision map based on tile properties in the TileD map
blocked = new boolean[grassMap.getWidth()][grassMap.getHeight()];
for (int xAxis=0;xAxis
About me

My name is Panos Konstantinidis and I live in London - U.K. I am a software engineer, a Java Champion and co-founder and co-admin of the hellenic jug in Athens - Greece.
In my spare time I also participate in experts exchange. You can get in touch with me at this e-mail address.


